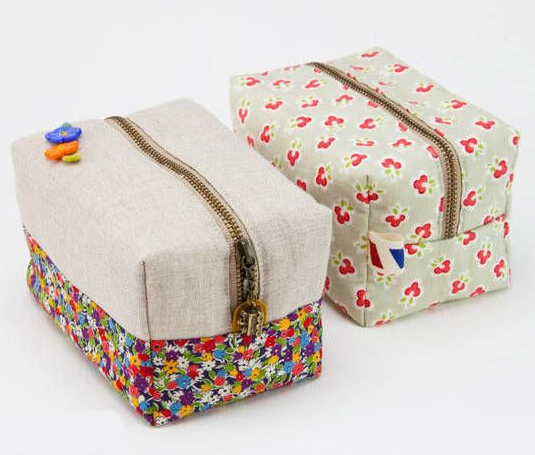
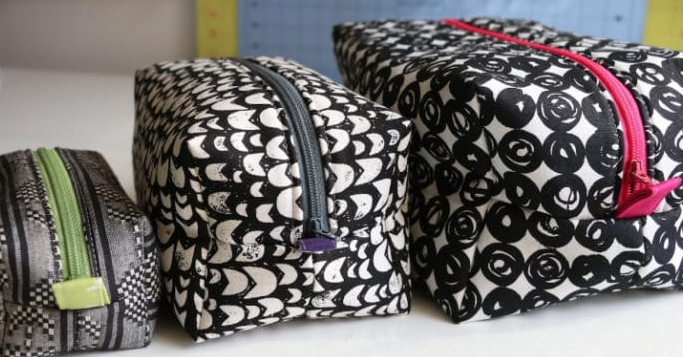
How to Sew a Box Bag (Beginner Guide)
Are you looking to add a touch of creativity to your accessory collection? If so, why not try your hand at sewing a boxy bag? These versatile and stylish bags are perfect for organizing your belongings and make excellent gifts for friends and family. In this guide, we will take you through the step-by-step process of How to Sew a Box Bag, ensuring that you achieve a professional finish with no exposed seams or raw edges. Whether you’re a beginner or an experienced sewer, this tutorial is designed to be easy to follow and produce stunning results.
Materials Needed | How to Sew a Box Bag
Before we dive into the sewing process, let’s gather the materials you will need for this project:
- Outer Fabric: 1 fat quarter or quarter yard of quilting cotton
- Lining Fabric: 1 fat quarter or quarter yard of quilting cotton
- Foam Stabilizer: 16’’ x 14 1/2’’ piece (or substitute with quilt batting or fusible fleece)
- Handbag Zipper: 9’’ or longer (preferably wide handbag zipper)
- Fabric Pen or Marker
- Safety Pin for turning
Step 1: Cutting and Quilting
To begin, we need to cut the fabric pieces and quilt them together:
Cut a 16” tall x 14 1/2” wide rectangle from both the outer fabric and the lining fabric. Cut a piece of foam stabilizer or substitute material to the same size.
Place the outer fabric over the stabilizer, right side up, and baste around the edges 1/8’’ from the edge. Repeat the basting process with the lining fabric and stabilizer.
Quilt the fabric and stabilizer together using your preferred method, such as straight-line quilting.
Step 2: Second Round of Cutting
Now that our fabric is quilted, we can proceed with cutting the bag pieces:
- From the quilted piece, cut two rectangles measuring 7” tall and 12 1/2” wide.
- Alternatively, you can use the provided template or use a fabric pen and ruler to draw the shape onto the quilted pieces.
- Cut out the rectangles, creating the main body of the bag.
Step 3: Prepare the Pockets
To add extra functionality to your boxy bag, let’s create two small pockets: Take two 3” x 3” fabric squares and fold them in half lengthwise, wrong sides together.
Attach a binding piece to the top edge of each pocket square, folding it over to the front side and stitching it down.
Hem the bottom edge of each pocket by sewing a straight line 1/4’’ away from the edge and folding it under.
Set the pockets aside for now.
Related: How to Sew a Garment Bag
Step 4: Attach the Zipper
Now it’s time to add the zipper to the bag:
Cut a 9” or longer handbag zipper and center it across the top edge of one of the bag body pieces, right side up.
Pin or clip the zipper in place, ensuring that the zipper tape is facing down against the right side of the fabric.
Using a zipper foot, sew the zipper to the fabric with a 1/4’’ seam allowance. Trim the excess fabric and fold the zipper tape against the back of the fabric, covering the trimmed seam.
Topstitch along the edge of the zipper for a neat finish. Repeat the process on the other bag body piece, aligning the remaining side of the zipper tape.
Step 5: Sew and Bind the Bottom Seam
Let’s sew the bottom seam of the bag and add binding for a polished look:
With right sides facing, pin or clip the long bottom edges of the bag body pieces together. Sew the bottom seam with a 1/4’’ seam allowance.
Bind the interior long seam with a 2 1/4’’ x 12 1/2’’ binding piece, attaching it to the raw edge and folding it over to the front side.
Stitch the binding down close to the fold for a clean finish.
Step 6: Sew the Boxed Corners
To give the bag its distinctive boxy shape, we’ll sew the boxed corners:
Measure and mark 1 3/4’’ from the seam line and from the fold on each corner of the bag.
Cut along the marked lines, creating a triangle shape. Pinch the fabric together at the corners, aligning the seam and fold lines. Sew across the corner with a 3/8’’ seam allowance to secure the shape.
Repeat the process for all four corners of the bag.
Step 7: Add the Tab and Side Pockets
To complete the bag, let’s add the finishing touches:
Attach the tab by folding a 2 1/2’’ x 3 1/4’’ fabric rectangle in half lengthwise and sewing along the long edge. Turn the tab right side out using a safety pin and press it flat.
Sew the tab to one end of the bag, positioning it between the outer fabric layers. Attach the side pockets by sewing them onto the bag body, aligning them with the drawn lines on the fabric.
Step 8: Finishing Touches
Finally, it’s time to give your boxy bag a professional finish:
- Trim any loose threads and press the bag to remove any creases.
- Fill your bag with your desired items and enjoy the stylish and functional addition to your accessory collection.
Congratulations! You have successfully sewn a beautiful boxy bag that is sure to impress. Feel free to customize your bags by experimenting with different fabrics, trims, or embellishments. These versatile bags make great gifts and are perfect for organizing your essentials. Have fun exploring different variations and sizes to suit your needs.
FAQs
Can I use different fabrics for the outer and lining?
How do I clean my boxy bag?
Can I resize the bag to make it larger or smaller?
Conclusion
Sewing a boxy bag is a rewarding project that allows you to showcase your creativity and sewing skills. With the step-by-step instructions provided in this guide, you can confidently create a stylish and functional bag with no exposed seams or raw edges. Experiment with different fabrics, colors, and embellishments to make each bag truly unique. Whether you’re a beginner or an experienced sewer, this project is sure to impress. So grab your materials and get ready to sew your own fabulous boxy bag today!